Battenberg Cake is the most impressive cake you’ll ever make – it looks like four cakes in one!

This month’s daring bakers challenge was to make a battenberg cake – a square oblong cake with 2 different colored checks and an edible marzipan covering. Traditionally made as a wedding cake for royalty, the first cake celebrated the marriage of Queen Victoria’s granddaughter, Princess Victoria to Prince Louise of Battenberg. It was flavored with almond and had the traditional yellow and pink squares – representing the 4 princes of Battenberg.
Not a big fan of anything pink nor of food coloring, I went with the non traditional recipe provided – the coffee and walnut version. Now if you had been able to watch me make this you would instantly see that I am not exactly cut out for baking. The recipe calls for an 8 inch baking tin with a parchment paper aluminum foil divider that you can pour the two different batters into their own equal sections. Well I figured a 9 x 13 inch baking pan was the closest thing I had and using the piece of paper I printed the recipe on to mark 8 inches I tried to divide the pan (because I mean, why would I own a ruler, right?). With my aluminum foil indestructible dividers set up I started on the recipe.
Unwilling to splurge on this foreign-to-me caster sugar I went with regular white sugar and substituted rice flour (which I had leftover from Dutch Crunch Bread) for the ground almonds. Without a proper Kitchen Aid (which I dream of) I resorted to my hand mixer – which, may I note, only contains one beater as D somehow managed to lose the other one years ago (how I would love to know). With flour sputtering out of the bowl the kitchen counter was starting to develop a more interesting pattern. A spill of milk and coffee further colored the counter. Finally the cake was ready for baking and I loaded my baking pan-turned into official battenberg cake tin bravely into the oven.
30 minutes later, with the yellow cake oozing past my no longer indestructible divider, the cake was ready. Though the yellow cake part had spread into more of a trapezoidal shape and was a little more crumbly than I had hoped for – the flavors were all there. And so I trimmed the edges, tried to create an even square face shape for each cake strip, and went about slabbing on the buttercream and forming the cake into its checkered square pattern. As you can spot in the photos I did not exactly get the cake to be filled with 4 perfectly squared checkered strips – but I think it’s close enough.
With my first attempt at working with marzipan I hit a few snags. How do you roll it out perfectly? I used a glass (naturally I do not own a rolling pin) and it kept sticking to the sides (annoyingly). Good thing the cake has 4 sides and I could hid the side with the most marzipan snags on the bottom.
And so you see after some minor struggles and a mess made out of the kitchen this stunning dessert was complete. Almost too pretty to eat, I’d say. D and I shared a slice – not bad, not bad at all. The almond, coffee and walnut flavors are all easily identifiable though subtle enough to softly blend together in your mouth.

Let me know what you think of this Battenberg Cake in the comments below! Would you have the patience to make this gorgeous cake yourself from scratch?
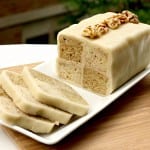
Battenberg Cake - is the most impressive cake you'll ever make! Each slices looks like it's four different cakes!
- 3/4 cup 11/2 sticks Unsalted Butter, softened & cut in cubes
- 3/4 cup Caster Sugar
- 11/4 cups Self-Raising Flour *note on how to make your own
- 3 Large Eggs room temp
- 1/2 cup Ground Almonds Can be substituted with ground rice
- 3/4 teaspoon Baking Powder
- 3 teaspoon Milk
- 1/2 teaspoon Vanilla Extract
- 11/2 teaspoons Instant Coffee Powder or Granules
- 3 Tablespoons Walnuts roughly chopped
- Buttercream:
- 1/2 cup 1 stick Unsalted Butter
- 2 cups Powdered Sugar
- 1/2 teaspoon Instant Coffee
- 11/2 teaspoons Milk
- 8 oz Marzipan
-
Preheat oven to 350 degrees F
-
Grease an 8 inch square baking pan with butter
-
Line the pan with parchment paper, forming a divide in the middle with the parchment or aluminum foil.
-
Whisk together caster sugar, flour, ground almonds and baking powder and combine with the butter and eggs in a large bowl. Beat together until the ingredients are combined and the batter is smooth
-
Place half the mixture into a smaller bowl, add the vanilla, 11/2 teaspoons milk and chopped walnuts. Mix until smooth.
-
Add the walnut batter into one side of the divided baking pan
-
Dissolve the coffee in the remaining 11/2 teaspoon milk and add to the remaining batter. Mix until smooth.
-
Add the coffee batter into the other half of the divided baking pan
-
Smooth the surface of the batter with a spatula, making sure batter is in each corner
-
Bake for 25-30mins until the cake is well risen, and a toothpick comes out clean.
-
Leave to cool in the pan for a few minutes and then remove from the pan to cool completely.
-
Once cool cut each section in half and continue to trim the edges until you have 4 even sized pieces.
-
To make the buttercream: In a separate bowl combine the 1 stick butter, powdered sugar, 1/2 teaspoon instant coffee and 1 1/2 teaspoons milk. Beat until smooth.
-
Spread a thin layer of buttercream on the inside strips of the cake to stick the strips together in a checkered pattern, one light next to one darker one and and switching the two underneath.
-
Dust a large cutting board with some powdered sugar and roll the marzipan out into a thin rectangular shape - large enough to cover all 4 sides of the cake.
-
Spread a layer of buttercream on top of the cake.
-
Buttercream side down, place the cake on the marzipan.
-
Continue to spread buttercream on remaining sides of the cake and press the marzipan around the sides.
-
Flip the cake over so that the marzipan seam is on the bottom.
-
Trim off excess marzipan and using a knife, score the top of the cake.
To make self raising flour: to 1 cup all purpose flour add 1 1/2 teaspoons baking powder and 1/4 teaspoon salt. Sift. Recipe From Mary Berry on BBC Food


liana says
Your Battenberg is indeed very pretty. But what happend with the other slices, my I ask? :))
Vicky says
Thanks! The other slices were quickly gobbled up!
The Cookie Fairy says
Yummmm!
Your Battenberg cake version looks so tasty!
I just love the flavors and colors combination
liana says
* may I ask 🙂
Natalie @ Once Upon a Cutting Board says
This looks gorgeous! Sounds like a frustrating experience but by the looks of this, I never would have guessed you had any problems with it!
Vicky says
Thanks! I think the frustrations and kitchen mess were well worth it in the end!
turmericnspice says
love your battenburg!! it looks gorgeous I would have never guessed you had issues with it !! awesome job
Vicky says
Thanks! Surprisingly it wasn’t as difficult to make as I expected.
Turmeric n spice says
I agree it was a fun challenge !! A great cake and I love marzipan :)))
Vicky says
It was my first time working with marzipan but I hope to use more of it in the future!
Turmeric n spice says
Mine too !
Rochelle says
Wow this is simply stunning! Even though you said you had marzipan snags, I’d never believe it. I don’t know why I haven’t been participating in the Daring Kitchen challenges in so long, this makes me want to get back into it 🙂
Vicky says
I guess I did a good job trying to straighten out the snags or hide them on the bottom! You should definitely get back into the Daring Kitchen challenges — I’m so happy I got involved with them in the first place as it’s given me a chance and the encouragement to test out so many different techniques and cooking styles!
Shelley C says
I had a similar problem, with my “sturdy” divider not holding out so well, but your cake looks like it was no worse for the wear! Seriously, that is a beautiful cake, and you should be very proud of your work on this challenge.
Vicky says
Haha yes that “sturdy” divider was not so sturdy after all. Thanks for the compliments, it was indeed a great challenge!
sandie says
Lovely Battenberg!
Ana_ILTdP says
I didn’t have time for making the DB challenge this month… Your looks nice! I like it because I am not a big fan of fondant or artificial colorings either 😉
Vicky says
Thanks – it definitely was an interesting challenge! Hope you have time for the July one!
Kathy Tobacco says
Vicky, I was surfing for bread recipes and saw this photo and had to know what that beautiful confection was . I knew immediately that I had to make it myself. Wow you did amazingly well for a woman with no Kitchen Aid or rolling pin. Your photography is so beautiful, I am guessing you don’t lack in photography equipment but if nothing would surprise me. Gorgeous! You did a superb job BUT, I wanted to caution you NOT to use a glass (unless it is a plastic one) as a rolling pin. I did it once and the glass broke and my hand was very badly cut. I met someone years later who did the same thing but her cuts were much worse and she required multiple stitches and physical therapy. I suggest a french rolling pin which is just a simple piece of wood with tapered ends. I used to think people with french rolling pins were just showing off but they are actually easier to work with because you only roll the section of dough you want to roll. When I roll out bread dough I find it much easier to form a perfect rectangle with the angled rolling pin and they are simple and inexpensive. Good luck and thank you for the beautiful recipe!
Vicky says
Hi Kathy,
Thanks for taking the time to leave such a lengthy comment! Haha yep without a Kitchenaid and a rolling pin the Daring Bakers challenges did get to be quite difficult at times! Thanks for the word of caution in terms of the glass as a rolling pin. I never even considered the glass breaking – I just assumed it would be strong enough to handle the pressure but yes a regular rolling pin is definitely worth the investment. I’ll have to look into the french rolling pin – thanks for letting me know about it! Let me know if you do end up making this recipe or if you have any other questions!
Peggy says
What stunning cake! I have never heard of a Battenberg cake. The flavor combination sounds wonderful. I will have to give this a try.
Vicky says
Thanks! I had never heard of it before the daring bakers challenge but it truly does look impressive once it’s finished! Let me know how it goes for you!
Allison says
YUM – would love to try making this!